The Show Carrier Clip we are about to share with you is something you are going to wish you had ever since little league or your beginning class of ballet. Ever see that useful device that makes you say, “Where was that when I was doing” anything. Well, when it comes to anything sports, or dance related, this was the case for us. See this amazing device is the best way we have seen to keep your shoes, boots, skates, and more attached to your backpack or gear bag. Because our shoes, especially after use in sports, dance, or the outdoors; they get grimy, stinky and otherwise not what we want next to our clothing.
Oh yeah, now your life just got easier. You are so welcome!
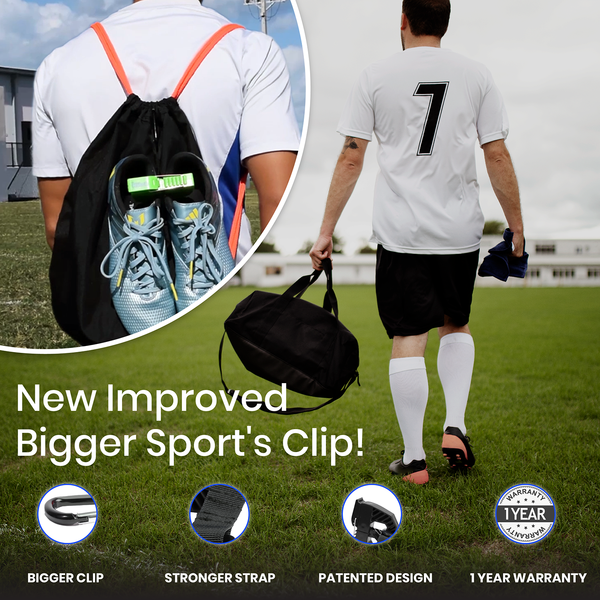
That is where this gets massive attention from us. See there are scenarios in play here. Any type of shoe, or boot, or foot covering device needs a way to be secure to our travel bags. And this Show Carrier Clip is everything we needed but didn’t know till we saw this. Then we had to get 1 or 10 of them to use for our everyday play and work.
You play hard, and you play in certain shoes, and then after play when you go home, you need “going home” shoes. You cannot seriously wear cleats, dance shoes, or even your prized running shoes when you drive home now can you. And you most likely are not going to want your just used to your full athletic ability shoes or cleats to be next to your clothing in your bag. Nope. So this is where this show
Also known as “A Hangers for Shoes”; this Shoe Carrier Clip is a must have for us all:
Picture it. You just got done playing a game of soccer with the boys. Your cleats are grass stained and for sure smell like sweat and tears. They are broken in, you love them, but you don’t love the idea of taking them home in your bag alongside your gear and unused back up clothing now do you? Nope. And that is where this Shoe Carrier Clip becomes a must have, and “I cannot believe I never had this before” device of necessity.
Plus, now you have extra room in your backpack or gear bag for other things. And come on, shoes do not belong in with your clothing and gear. They need to be proudly displayed and aired out as you go from play to work, play to home, or play to play.
Convenient odor eaters are available to add to the experience of playing hard, but not sharing the odor with the family too. If I only had these for my hockey skates. Oh how they must have made my wife happy when I tossed them into the car.
Ski boots. Cowboy Boots (after a hard night of dancing or even a party) when you need to put them away. Up in the closet, and being aired out. These devices are so useful, you should have one for each pair of foot covering you have. Or at least the ones you play in.
Start Enjoying things without the mess. Just utilize these buggers, and act as if you had these all your life. Cause once you get them, you will wish you had them long before you found them here.
Get your Shoe Carrier Clip here. And be sure to think of others. Great gift for you, your loved ones, the entire team, and don’t forget the Coach!
OH – and for another product you will wish you had before, check out these handy or rather handsfree options for your Smartphone and its use as you drive, play, bike, boat, golf or more. See it all here.
Thank you for reading this article’s description.
What do you think about the Shoe Carrier Clip?
Please share the article with your family and friends on your favorite social media platforms.
======================
How To Make Travel Shoe Bag
Hello – everyone, today we are going to make a travel shoe bag. This is the travel shoe bag. We’Re going to make it’s a very easy to make shoe bag beginner friendly, and it will take you about 15 minutes to make this bag.
This is very useful for your luggage, for your gym, shoes has a zipper. It doesn’t have lining. That’S why it’ll take only 15 minutes to make the bag. It’S got a handle and this depth here for your shoe.
We’Re gonna make this bag in four simple steps, step one getting our materials together, step: two! Inserting the zipper i’ll show you how to insert a zipper sim, very, very simple process of inserting the zipper step, three the handle, how to make and insert the handle and step four putting the bag together.
So without further ado, let’s start making the bag. The first step, the materials we will need for this small shoe bag. We will need a fabric which is 14 inches by 24 inches. We’Ll need a the zipper tape, the zipper pull we will need fabric for the handle.
You can use the same fabric. You can use another fabric and for the handle is two and a half inches by nine inches long, so the main fabric, i have actually searched the main fab the fabric, because this is waterproof canvas.
I chose waterproof canvas for this fabric because you know with your shoes in there you want to be able to wash the backer, and so the first step is to attach the fabric to the zipper you attach the zipper to the short side of the fabric, not The long side, but the short side to the fabric – and we always remember when attaching zippers – it’s actually a very it’s very simple – to attach zippers, just the right side of the zipper to the right side of the fabric.
The right side of the zipper to the right side of the fabric, so i’ll use my clips to attach the zipper to the right side of the fabric. There is a sort of a line which you can sew on, so it’s not it’s not complicated.
It’S it’s! It’S very beginner friendly. So let’s do this, attach the zipper to the fabric and then we’ll we’ll sew it on this project. Will take you about 15 minutes to do it’s easy, it’s worth doing so, let’s start all right, let’s back stitch cut! Now you want to top stitch so to top stitch, you could use an iron or you could press it with your fingers, because this is a kind of this is a waterproof canvas and it’s not that easy to iron, and i don’t think it’s really necessary for This project i’m going to finger press it, so this is how we do it just finger press the fabric against the zipper tape all the way, and let’s do the top stitch.
The reason to increase the stitch line is because it’s nicer when the stitch line is longer and you can actually see the stitch line on the top stitch. So, okay, so now we back stitch okay. Now, so we’ve done the first part of the zipper.
Oh, the first edge of the zipper now we’ll do the other so again right, sides together and we’ll do it to the other end of the zipper. Okay, i will put the link of where to get the continuous zipper. I got mine from amazon and i buy quite a few meters at a time.
Okay, so now i because it’s a continuous zipper, i can actually detach it and do the top stitch again, i’m going to finger press it. So this is the other side of the zipper. Now we’ve done the zipper and we’re gonna insert the pool to the tape i find the best way to insert the pull to the tape is to cut a tail with the actual zipper being shorter than the tail of of the fabric.
So the actual zipper is shorter. Now all right. So this is the pull. It’S really tiny and you want to look for the rounded bit of the pole. The rounded bit hold on to it like this and make sure they align, because if they don’t, you can always do it again.
So these two bits must align because that’s the sewing part and then you, you cut off the tail now the neck. So we finish step two to mark the center with pins. Now what you would do is you would not align the middle of the zipper to the pin align the middle of the zipper to the pin okay.
So exactly the middle of the zipper to the pin and now you going to attach the handle, how do we make the handle from this fabric two and a half inches by nine inches? You would fold it into half iron press it and then you would fold each part again to reach the middle line and put your clips on.
So it’s best to press everything with your iron. Okay and then you would stitch it. Here’S one i sewed earlier. So i’m just going to show you how to attach it. So what you do is because the zipper is going to close this way i like, to put it in the top one inch on either side of the zipper.
So this is how you place it. One inch on either side of the zipper okay and you would sew it down just sew it a few times so that you reinforce the stitch. Okay, so that’s been stitched and cut off all these stray threads, and so, with we’ve finished the third stage of making this shoe bag.
Now we want to sew the whole bag together. To do that, you would open the zipper to more than half, but but not more than that, because you don’t want the zipper pull to come off the tape so just open it more than half turn it upside down.
Make sure that the handle is on the inside it’s nicely tucked un tucked underneath and you are right in the center of the fabric. The middle point is there and after you do that you want to take in the sides by two to two and a half inches.
The reason you do this is to ensure that there’s a nice depth for your shoes and again measure two inches, put a pin and we’ll sew across okay. So let’s do this and remember to cut off all your stray threads and the project’s really been done now.
We’Re just going to turn it right sides together bit of embellishment on the zipper pull so that it pulls easily i’m going to just put a ribbon as i’ve cut. This ribbon nine in nine inches long and i’ve done the um edges like that.
So it went free and made a little tail there and i’m just going to attach it all right. How easy is this project and it’s done and put your shoes in there? Thank you for watching and if you like this project, thumbs up and subscribe, and please give me your comments and share the um bags, the shoe bags that you have done.
Thank you for reading this article’s description.
What do you think about the Shoe Carrier Clip?
Please share the article with your family and friends on your favorite social media platforms.