When the sun is not your friend, it is self tanning and the right products for that Golden tan. Not that orange tint that the competition leaves our skin with. We want the golden, sun kissed look, without the Sun Damage. What we do not want is to look like an orange oompa loompa. If you want to look as though you have been sun kissed, and enjoyed the rays, this is the self tanner for you. Frankly, it is the self tanner for anyone that needs that glow without the sun.
The self tanning products you are just a click away from will give you that Look Like You’re On Vacation Indefinitely. And continued applications ensure you can be looking that way indefinitely.
We are literally talking about Gorgeous Sunless Tanning. No sun, but it sure looks like you enjoyed yourself under the suns rays. Only you avoided the sun for hours, and hours. And no-one is the wiser, because the self tanning products found here are going to make you smile with delight, and without the Orange!
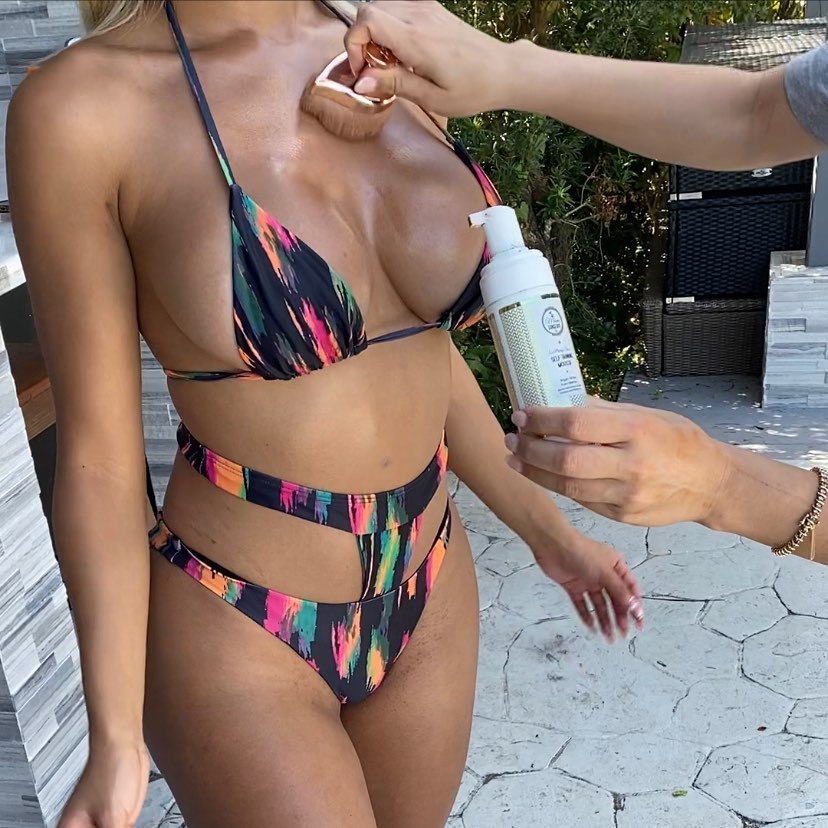
Natural looking tans from a Self Tanner is a reality! We found it:
And not only is it natural looking, but it is also Paraben Free, Quick Drying, Cruelty Free, and it is also Made in the USA. It is all the American Tan you want, without the sun. You will be looking great for those moments you are in a bikini, or wearing that sun dress. You’ll look the part, but be in a safer mode for your skin.
And – speaking of your skin, you have to try this Body Scrubber as well. It is the best clean you’ll ever get. And when you are looking to apply the Self Tanner, you want to be sure your skin is in its cleanest state. We got you! Get your CLEAN on here!
Now that you have found the best Self Tanning solution, its time to sit down, relax. Oh and have yourself an incredible glass of truly amazing fine wine. In fact, lets take you to the place where Fine Wines are made; Napa and Sonoma Valleys. We have something you are going to love. Get the information, watch and learn, then start enjoying the best value and access to body detox on the Planet!
======================
Hey everybody: today, I’m going to show you how to get the perfect bronzed glow tan at home, using self-tanner hit that subscribe button, and let’s turn this pasty pale skin into a glowing beautiful tan.
Ok, first things: first, you want to exfoliate your skin, you don’t want dry clumps of skin, because the self-tanner tends to stick to that and it looks blotchy and kind of gross. Now this doesn’t mean that you need to go out and buy an exfoliating polish scrub, etc.
You can simply use a loofah or a wet washcloth in the shower and kind of run it over your skin, making sure to concentrate on those dry areas such as your elbows, and your knees. Second thing is: you want to shave beforehand? Not only does this exfoliate your skin, but also, if you shave, right after it will kind of take your self-tanner off next, I like to apply lotion all over my body just so that the self-tanner doesn’t stick to dry spots.
That way, all my skin is nice and moisturized. I just use a really light coat and then I use a like a medium amount on my elbows wrists knees, ankles, etc. Okay, so the next piece of advice I have for you is to invest in a tanning mitt.
This one was seven dollars on Amazon, I’ll link it in the description. I’Ve also seen them for $ 5 at Walmart and Target. This kind of just helps to keep our hands from getting gross, and I’m going to show you how we’ll tan our hands toward the end.
And lastly, I really recommend you find an old makeup brush this one’s. Just like a blending foundation brush, I’m gonna show you how I do my face my hands and my feet with this. Okay, and today, I’m gonna use my favorite self-tanner of all time.
This is the St. Tropez Express. Basically you leave it on one hour. If you want like tea in two hours for medium tea and three hours for dark tan, I always leave it on three hours. I always want the darkest tan for this pale pale skin.
This is basically just a dark mousse and you can see it while you put it on which is extra helpful. So let’s get started so it’s always important to shake it up super well. I always start from the bottom and work my way up, so I’m gonna scoot you guys down.
So you can see how I do my legs, so I just apply one pump. I always apply it to the mitt first, never to my skin first, and so I’m just taking this and I’m doing the one pump for the bottom portion of my leg here: blending it all in I’m gonna grab another pump and go directly on top of That I like that, you can see where the bronzer is going to make sure you don’t have any streaks.
Okay, I’m gonna grab another pump here and I’m gonna start doing my thigh area. I’M gonna do the same thing that we did below making sure to cover my knee okay, I’m gonna go in and grab another pump. I’M gonna go directly on top of that one.
You want to make sure that you don’t have lines back here. So go over the back of your knee really well, I like to keep rubbing until I’m confident that it is all rubbed in and there’s no splotches all right, so this leg is done.
Let’S do this one really quickly! You want to get the tops of your feet, but don’t worry if they’re not perfect, because we’re going to go back over them with the brush. I just rub it until it looks all even and there’s no splotchiness again make sure that you’re not skipping over your knee and make sure that the back of your knee is blended as well.
Okay looks good and looks even I’m gonna show you how I do my feet so here I’m going to take maybe half a pump on this little makeup brush here and what I’m gonna do with this is just gently blend it all over.
My foot going over my toes my ankles just making sure it’s all blended out like you would blend a foundation there. We go much better. All right. My legs are finished. I’M gonna move me back up and do my upper body.
Okay. So if I was doing my entire body like I wanted to wear swimsuit on vacation or something like that, I would just do the same exact motion over my stomach. My back next up is arms and face so I’m gonna take one pump here and I like to start the bottom of my arm here and just rub it in just like I did my legs making sure to go over the elbow.
Don’T leave that part out? I’M just gonna go onto the top of my hands here and I’m gonna show you how we do the rest with a brush. In a second make sure you don’t leave out your wrists, they’re, nice and moisturized from that lotion.
That I just put on so I’m not worried about it being splotchy. Okay, I’m gonna grab another pump for up here; okay, so here’s the second pump and I’m gonna apply it to the top portion of my arm. I do like to go over my armpits.
I know some people, don’t it’s just personal preference make sure you don’t leave out any spots. I’M just gonna apply another pump here, just because I like the extra coverage, and I like it to be extra dark, but you don’t have to this is usually where I’ll get streaks.
If I get them so I’ll, just make sure that I look over this area super well and make sure that it’s not splotchy, but it’s looking pretty good okay. So, let’s move on to my hands, I’m going to show you up really closely here, so I just apply about 1/4 to 1/2, a pump on my blending brush and then I take my hand – and I basically just apply it everywhere – with the blending brush – apply it Over my fingers and between my fingers to my wrist blend it in to the self-tanner we’ve already applied, I don’t apply it to my palm because, naturally, like my palms, don’t tan and I don’t feel like it – looks weird to have a white palm, alright tada, it’s Gon na blend in beautifully once this develops, I promise ok next, I’m going to do my chest, so I’m gonna pump out one pump for this, and I’m just gonna apply this all over my chest.
I take this all the way up my neck as well, but I don’t touch my face yet. Okay, so now I’m just gonna fast forward really quickly through this other arm, because you already know how I did this arm okay, and for my back I basically do the same thing, so I just apply a pump on each side, so I know it can Be really tricky to reach your entire back.
Luckily, my arms are really long and I’m able to do it, but you might have to enlist the help of someone else to help you. Okay, so both arms, both hands and my neck and chest area are tanned. So let’s do my face.
Okay, so I’ve noticed that when I use the mitt on my face, it gets splotchy and gross. So I definitely don’t use that on my face anymore. I just use this brush and blend it all out. So I just work with a little bit at a time, and I just take it and apply it basically how I would like a foundation just make sure that I get evenly all over my face, make sure you blend it down onto your neck.
I’Ve never had any trouble with this one breaking me out, but you might just want to experiment on a small portion of your face before applying it all over make sure you’re blending it into your hairline.
You don’t want a line of white right around your hair. All right and just keep blending until you feel like it’s all, even I like to apply just a little bit on my ears as well, just to make sure they don’t stick out and are super pale, okay and then at the very end.
I just take my magical little blending brush and just go over the areas that I’m concerned about, such as my elbows my knees, my ankles, which we already did my wrists, etc. This brush just makes it to where it’s all beautifully, like airbrushed blended out all over.
My body and I don’t have to worry about like harsh lines or white to dark, etc. I know this seems tedious, but once you do it a couple times, it’s just like second nature. I can do this entire routine in about seven minutes.
Okay. So if I was applying this without clothes on, I would wait about five to 10 minutes before putting my clothes on just so I don’t get lines and it doesn’t kind of rub it off. Well, it’s still wet, since this is the three hour dark tan.
I’M gonna leave this on for three hours right now. I’M gonna come back and then show you what it looks like after three hours, then I’m gonna shower and then show you what it actually looks like once you rinse off all the green grossness of this.
If I want a super super dark tan, I can either apply this two days in a row. But what I actually really like to do is come back in an hour an hour and a half apply a whole other coat of this and then rinse it off.
In three hours I feel like it makes it extra deep and dark okay, so I’m setting my phone timer for three hours and I’ll come back and show you what it looks like and then I’ll shower. Okay, friends, it has been three hours since I applied this.
I don’t know if you can see, but I look very like green, slash orange, which just happens with this formula until I wash it off, but once I wash it off I’ll, look nice and bronzed and glowy. Can you see my legs? Look much less pale! All right, I’m gonna go wash it off and I’ll be right.
Back, okay, I am all showered and clean, and I’m left with this beautiful bronze skin. I’M gonna come up closely, so you can see it okay, so I hope you can tell on my arms how it’s blended nicely, there’s no lines, there’s no splotches that blending brush works really.
Well. I’M such a big fan, there’s no lines here my face. There’S no white next to my hairline, because we blended it out with a brush. Alright, let’s go down! I’M going to show you my legs. Okay, so see how there’s no line it’s nice and blended beautifully where we did the brush.
There’S no orange around my ankles! It’S all nice and blended, because we did the lotion before and then blended it out with the foundation brush. My legs are nice and bronzed, and even if we compare this to the before this is the before tastiness and then this is the after bronzed glowy.
Goodness all I did after showering was apply some lotion and I’m good to go. I make sure I reply lotion every time after I shower just to make sure that my skin is nice and moisturized. It helps the tan last a little bit longer.
I usually apply this once a week. It will last about 10 days, though, make sure you hit that subscribe button for more beauty and style made simple guys check out this video, I’m going to link it right up here.
I show you how you can keep your skin protected from the Sun this summer. Also, I’m going to post a video next week where I compare this St. Tropez self-tanner to another top-rated self-tanner.
Thank you for reading this article’s description.
What do you think about the Self Tanning?
Please share the article with your family and friends on your favorite social media platforms.